Select Add and Update Events from the Events menu to begin adding events to your calendar.
The two tabs on this page allow you to view upcoming events, going forward in time, or past events, going back in time.
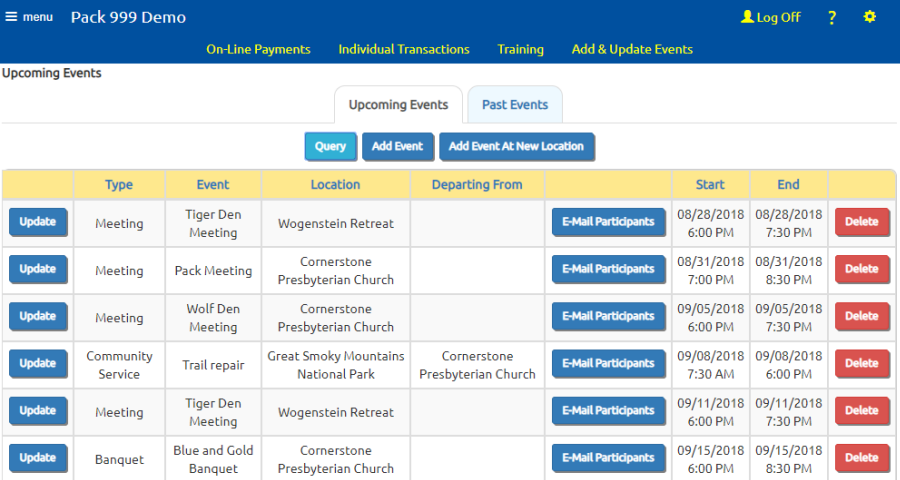
Click Add Event to add a new event for which you already have an Event Location on file.
Click Add Event At New Location to create a new event location and a new event, in that order.
Either way you'll eventually end up at a screen that looks like the one below.
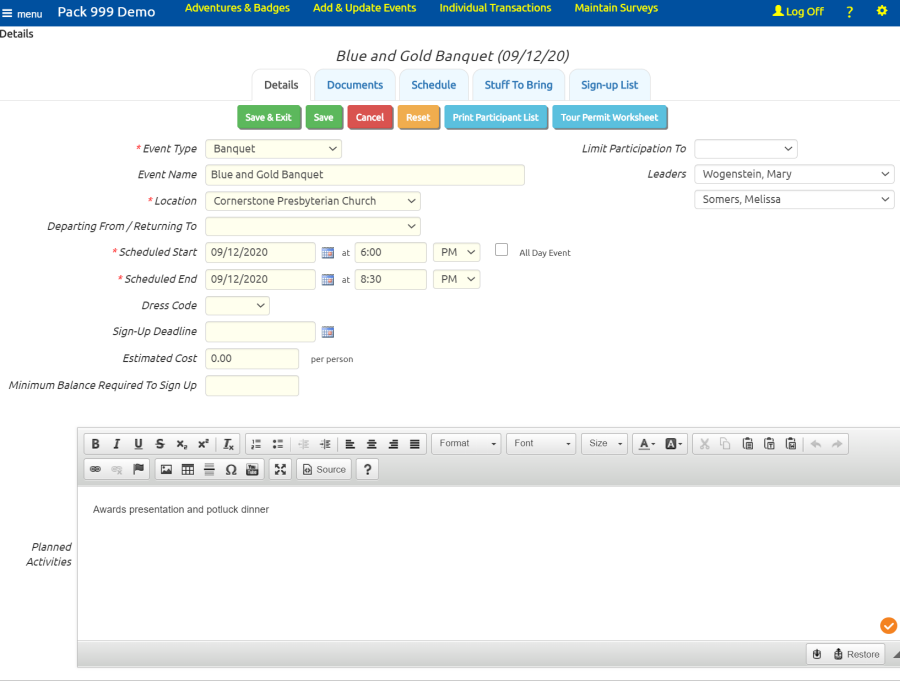
This page has several tabs that allow you to enter information about this event. The first tab is "Details".
The Event Type categorizes this event. It also determines which fields will be available on this event, as configured in the Event Type table.
The Event Name is optional, but should be used when the Event Type is not sufficiently descriptive.
The Location should always be the destination for this event. If you are leaving from a drop-off location, like your regular meeting place, select that location in the Departing From / Return To field. For events that do not require travel, you may leave the Departing From / Return To field empty.
The Scheduled Start is when you expect everyone to be at the departure location. The Scheduled End is when you expect to return to that location.
The Dress Code lets you select a value that you've configured in the Dress Codes table.
The Sign-up Deadline allows you to prevent users from signing up for this event after the specified date. If you enter a date in this field, users will not be able to sign up for this event from the My Stuff menu or the Group Calendar after this date. You will still be able to update the planned attendance from the Sign-Up List tab (shown later on this page).
The Estimated Cost is for informational purposes only. It does not have any effect on the accounting system.
The Minimum Balance Required To Sign Up overrides the minimum balance that was configured for this event type. Members who have less than this amount in their account when they try to sign up will be prevented from doing so. Please note that this number can be negative; if you use a negative number then only those members who are already in arrears will be prevented from signing up for an event.
You can select a dynamic subgroup from the Limit Participation To dropdown list to restrict attendance to the current members of that subgroup. Cub scouts will find this useful for den meetings.
You can select the leaders for this meeting from the Leaders drop down lists.
The Planned Activities will be visible to everyone in the pack on the Calendar and the Automated Newsletter, so make it friendly and informative.
You can save your work on any of the tabs by clicking on another tab, or by hitting the Save or Save & Exit buttons.
The second tab lets you upload documents to this event.
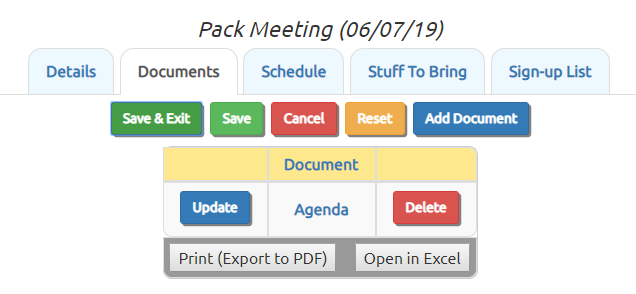
You can upload as many documents as you'd like to each event. Click Add Document to begin adding a document.
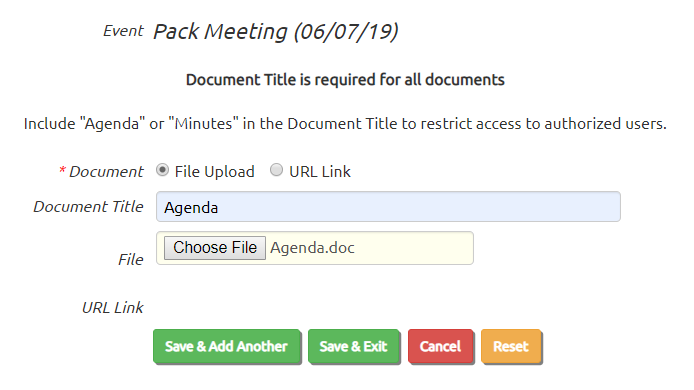
You can select "File Upload" to upload a file, or "URL Link" to reference an existing file on the web. In either case, you must enter a Document Title. If you include the word "Agenda" or "Minutes" in the title, it will only be visible to users who are authorized to view the agenda and minutes documents.
Use the File control to select your document from your local drive. The file will not upload until you click one of the Save buttons.
If you are linking to an existing file on the web, enter the complete URL in the Link URL field, beginning with either http:// or https://.
The third tab lets you schedule the activities for this event. It can also be used to enter the menu for each meal.
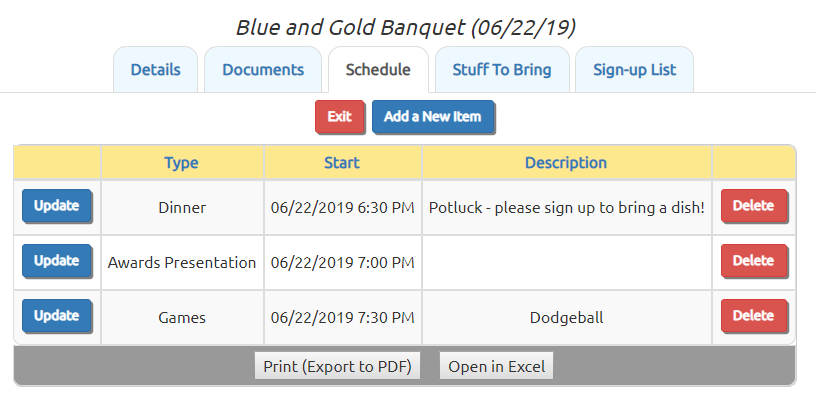
When you add an activity, if the drop down list for Activity Type is empty, please go to Site Configuration → Activity Types to populate the list.
The fourth tab, "Stuff To Bring", is where you can ask members to sign up for things that will be needed.
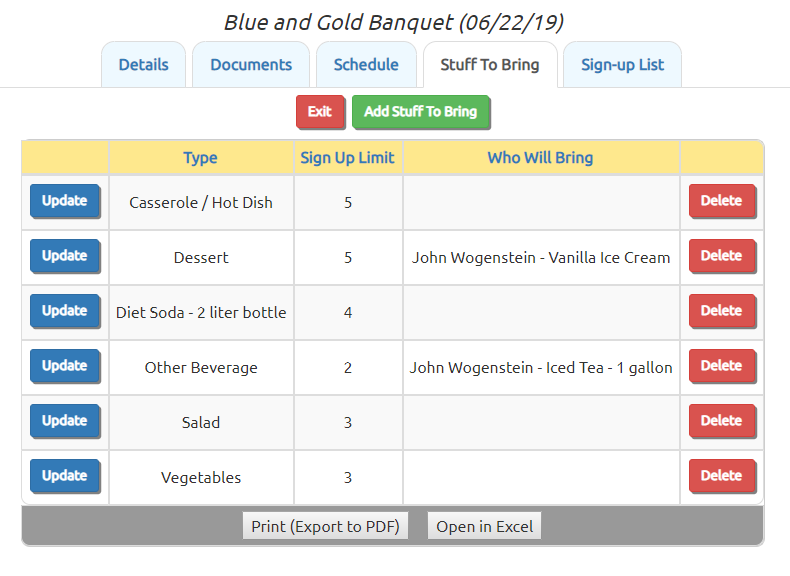
This can be used to request snacks and drinks for den meetings, or specific types of food for potluck dinners. It can also be used to ask for craft materials or equipment that you'll need for a particular program.
The Sign-Up Limit will limit the number of members who can sign up for a given item from the Calendar, but will not prevent you from adding as many volunteers as you'd like from this page.
The fifth tab, "Sign-up List", allows you to update everyone's participation plans.
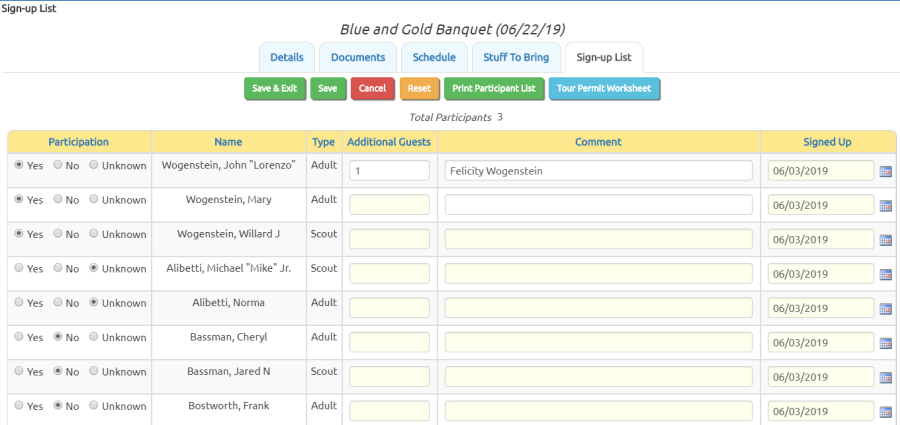
After the event is over, you can use this page to note who actually attended; you can also use the Take Attendance pages for that purpose.
Click Print Participant List to produce a report which lists the members who plan to attend.
Click Tour Permit Worksheet to produce a detailed report about this event.
At the bottom of the page you will find two more buttons, which should only be used AFTER you have saved any changes to the sign-up list:
- E-Mail Participants to initiate an e-mail to everyone who has signed up for this event.
- Invite Undecideds to send an e-mail invitation to anyone whose status is still "Unknown".
If this event has an Event Type that is configured to allow shifts, you will also see a "Shifts" tab. This will be explained on the next page.